google Ads
Custom Search

Thursday, May 28, 2009

Creating authentication restriction in Apache

Using htpasswd

To create a new user file and add the username "martin" with the password "hampster" to the file /usr/local/etc/httpd/users:

   htpasswd -c /usr/local/etc/httpd/users martin

The -c argument tells htpasswd to create new users file. When you run this command, you will be prompted to enter a password for martin, and confirm it by entering it again. Other users can be added to the existing file in the same way, except that the -c argument is not needed. The same command can also be used to modify the password of an existing user.

After adding a few users, the /usr/local/etc/httpd/users file might look like this:

martin:WrU808BHQai36
jane:iABCQFQs40E8M
art:FAdHN3W753sSU

The first field is the username, and the second field is the encrypted password.

Configuring the Server

To get the server to use the usernames and passwords in this file, you need to configure a realm. This is a section of your site that is to be restricted to some or all of the users listed in this file. This is typically done on a per-directory basis, with a directory (and all its subdirectories) being protected (Apache 1.2 and later also let you protect individual files). The directives to create the protected area can be placed in a .htaccess file in the directory concerned, or in a section in the access.conf file.

To allow a directory to be restricted within a .htaccess file, you first need to ensure that the access.conf file allows user authentication to be set up in a .htaccess file. This is controlled by the AuthConfig override. The access.conf file should include AllowOverride AuthConfig to allow the authentication directives to be used in a .htaccess file.

To restrict a directory to any user listed in the users file just created, you should create a .htaccess file containing:

  AuthName "restricted stuff"
AuthType Basic
AuthUserFile /usr/local/etc/httpd/users

require valid-user

The first directive, AuthName, specifies a realm name for this protection. Once a user has entered a valid username and password, any other resources within the same realm name can be accessed with the same username and password. This can be used to create two areas which share the same username and password.

The AuthType directive tells the server what protocol is to be used for authentication. At the moment, Basic is the only method available. However a new method, Digest, is about to be standardised, and once browsers start to implement it, digest authentication will provide more security than the basic authentication.

AuthUserFile tells the server the location of the user file created by htpasswd. A similar directive, AuthGroupFile, can be used to tell the server the location of a groups file (see below).

These four directives have between them tell the server where to find the usernames and passwords and what authentication protocol to use. The server now knows that this resource is restricted to valid users. The final stage is to tell the server which usernames from the file are valid for particular access methods. This is done with the require directive. In this example, the argument valid-user tells the server that any username in the users file can be used. But it could be configured to allow only certain users in:

  require user martin jane

would only allow users martin and jane access (after they entered a correct password). If user art (or any other user) tried to access this directory - even with the correct password - they would be denied. This is useful to restrict different areas of your server to different people with the same users file. If a user is allowed to access the different areas, they only have to remember a single password. Note that if the realm name differs in the different areas, the user will have to re-enter their password.


http://www.apacheweek.com/features/userauth

Sunday, October 5, 2008

if you get error REP-3000: Internal error starting Oracle Toolkit.


if you get this error, first check your host with oracle user, if you can open xclock. If you can't, run this under root privilledge,
xhost +

but if you can, but still having the same error, follow these instruction.

To manually add the DISPLAY value:

  1. Change directory to $ORACLE_HOME/opmn/conf.

  2. Back up the opmn.xml file.

  3. Add a new line of type in the opmn.xml file configuration section for the new Reports server. Use the following example as a guide, where reportserver_name is the name of the Reports server, and display_value is that value of the DISPLAY

         
    ..process-type id="ReportsServer" module-id="ReportsServices"..
    ..process-set id="reportserver_name" restart-on-death="true" numprocs="1"..
    ..environment..
    ..variable id="DISPLAY" value="display_value"/..
    ..variable id="PATH" value="/project1/AS10g/FR_STANDALONE_M23_MAR08/ohome/bin:/usr/bin:/etc:/usr/sbin:/usr/ucb:/usr/bin/X11:/sbin:/usr/java130/jre/bin:/usr/java130/bin:/usr/bin:/bin"/..


  4. Reload the opmn.xml file, as follows:

    $ $ORACLE_HOME/opmn/bin/opmnctl reload

  5. Stop and then restart the Reports server:

    $ $ORACLE_HOME/opmn/bin/opmnctl stopproc ias-component=reportserver_name
    $ $ORACLE_HOME/opmn/bin/opmnctl startproc ias-component=reportserver_name

  6. Verify that you can run a test report. For example:

    http://mydomain.com:7782/reports/rwservlet?destype=cache&desformat=html&server=reportserver_name&report=test.rdf&userid=scott/tiger@twotask


source : http://download.oracle.com/docs/cd/B13597_05/bf.904/b13667/toc.htm

Thursday, September 25, 2008

How to Using Vinetto

How to Using Vinetto 0.06 (r56)

This is part of the Digital Forensics section of BT2 and 3
Note: If using BT3 and this tool doesn't work then please see the thread here: [url=http://forums.remote-exploit.org/showthread.php?t=10744]Possible bug[/url]

Some Background: Vinetto is a forensics tool to examine Thumbs.db files.It is a command line python script that works on Linux, Mac OS X and Cygwin(win32).
Source: [url=http://vinetto.sourceforge.net/]Vinetto[/url]

Disclaimer: This information is for educational purposes only and not to commit a crime.
If you do something that causes you to hose your box don't come kicking and screaming on the forums!

OK you may be asking your self "why would I need this tool?" This tool and the whole "forensics section" of BT is one that the average person is not going to use. Now on the other hand if you conduct forensics investigation as either some type of "police official" or as a pen tester, then this tool can come in very handy for you.
Now there are other tools that can do the same basic thing however if you need it it's included.

NOTE: When doing any type of forensic work it is imperative that we do not damage the target computer in any way. Having said that we should boot our BT disk over our target computer using the "bt nohd" boot option. If you don't know what this means then stop here and go read about it here: [url=http://backtrack.offensive-security.com/index.php/Cheats]Cheats[/url]

Ok in order to get this to work we need to go to the command line or alternatively through K>Backtrack>Digital Forensics>All>Vinetto
Now lets have a look at the options that are presented when we do a --help
[code] bt ~ # vinetto --help
usage: vinetto [OPTIONS] [-o DIR] file

options:
--version show program's version number and exit
-h, --help show this help message and exit
-o DIR write thumbnails to DIR
-H write html report to DIR [/code]

Now the output shows us only two useful switches -o will write our thumbnail to a given directory and the -H creates a html report to a directory
and these two can be combined like so -Ho this will give us both the thumbs and and report in html format. This is useful if we have a lot of thumbs to go through.
So far so good right? OK now for my example usage.

I booted BT over my laptop that has Windblows XP next I opened a shell and did a:

[code]# find / -name Thumbs.db
/mnt/hda1/Program Files/Windows NT/Thumbs.db
/mnt/hda1/RECYCLER/Thumbs.db
/mnt/hda1/WINDOWS/Thumbs.db
/mnt/hda1/Program Files/Microsoft Office Old/Office/Bitmaps/Dbwiz/Thumbs.db
bt ~ #
[/code]

The above is a truncated version of the output, yours will be different. Our target file will be the last one, the "/Dbwiz/Thumbs.db"
So now you need to setup a storage device of some sort I used a usb stick seems to be the easiest. now go ahead and mount it and make a directory in it.
I used "thumbs" for mine. Ok now we have both a target directory and a "save location" we can go ahead and extract our thumbs to it.
so in a shell again give:

[code vinetto -Ho /mnt/sda1_removable/thumbs "/mnt/hda1/Program Files/Microsoft Office Old/Office/Bitmaps/Dbwiz/Thumbs.db"

** Warning: Cannot find "Image" module.
Vinetto will only extract Type 2 thumbnails.


Root Entry modify timestamp : Tue Apr 4 02:15:03 2006

------------------------------------------------------

0001 Mon Mar 22 01:00:00 1999 ORDPROC.GIF
0002 Mon Mar 22 01:00:00 1999 ASSETS.GIF
0003 Mon Mar 22 01:00:00 1999 CONTACTS.GIF
0004 Mon Mar 22 01:00:00 1999 EVTMGMT.GIF
0005 Mon Mar 22 01:00:00 1999 EXPENSES.GIF
0006 Mon Mar 22 01:00:00 1999 INVENTRY.GIF
0007 Mon Mar 22 01:00:00 1999 LEDGER.GIF

------------------------------------------------------

7 Type 2 thumbnails extracted to /mnt/sda1_removable/thumbs/
[/code]

hit enter and you should see the same basic output as above.

This show use the thumbs that we have recovered and the time they were created on our target and as well as their respective names.
Now we can go to our "save location" to verify our files are there. Also check out the .html output file as this is easier to manage then all of the other files.
I have posted some photos of the output if you need look at them [url=http://picasaweb.google.com/Archangel.Amael/VinettoTutorial]VinettoOutput[/url]

And that's it, a simple program that can help if you need it.
Please leave some feedback if this helped or hindered you, Thanks :)

NOTE: Credit to the author of this tool and to the authors of the [url=http://www.amazon.com/Penetration-Testers-Open-Source-Toolkit/dp/1597492132/ref=sr_1_1?ie=UTF8&s=books&qid=1198971560&sr=1-1]THE BOOK[/url]
This is where I got most of the information from as well as the vinetto website.
I did find in my experiments that you need to use the flags as "-Ho" and not "-oH" doing so I got a "vinetto: error: incorrect number of arguments" error each time.

Sunday, September 21, 2008

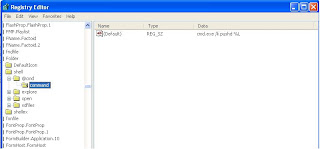
Adding 'Command Prompt Here' to explorer


Open regedit, and navigate to HKEY_LOCAL_MACHINE/Software/Classes/Folder/Shell. Make a new key called 'Command Prompt' and set the default key to whatever you want listed in the menu. Inside that key make another key named 'command' and set the default string to
cmd.exe /k pushd %L
Close regedit, right click on a folder and you should now have a new right click menu with a shortcut used to open a command prompt window to that folder. resource - http://r00tsecurity.org/forums/lofiversion/index.php/t4917.html

Thursday, September 11, 2008

Configuration for Oracle Form 10g, so you can build a page

#This is added for /oracle/product/10.1.2/midr2/forms/server/formsweb.cfg
#
# main config# URL like "http://serverip:8889/forms/frmservlet?config=xxx".
[xxx]
separateFrame=True

lookandfeel=Generic
width=800
height=650
form=LOGINDC.fmx
userid=user/passwd@dcdb
workingDirectory=/oracle/product/10.1.2/midr2/forms